Tuesday, January 30, 2018

La Chandeleur: French Crepe Day


                                                                                                               All Photos CPaul
I've always been fascinated by the way different holidays are celebrated in cultures around world. It seems on almost any given day of the year, there is a festive occasion of some sort going on somewhere . 
 I was delighted to learn recently that throughout France, Candlemas, also known as La Chandeleur or Jour de Lumieres, is traditionally celebrated on February 2nd by the lighting of candles and by eating that french favorite, crepes! Not as familiar stateside, this celebration of La Chandeleur seemed the perfect respite from the lengthy drab winter weeks following fun and frenzied holiday festivities and was a good excuse to try my new crepe pan! (a steal at Homegoods)
   
 For many Christians, this February date, marks the day Jesus was presented to the Temple in Jerusalem, but the holiday can also be traced much further back to older pagan roots, honoring the eventual return of Spring and longer sunlit filled days.
   
But why candles and crepes? 
Some say Pope Gelasius established the tradition in the 400's by distributing crepe like treats to pilgrims in Rome during annual candlelit processions. 
The round shape and golden color of crepes was thought to represent the welcoming return of the sun as well as, more practically, a good way to use up surplus flour, a staple that time of year.
I displayed with (flameless) candles and french and Spring inspired props
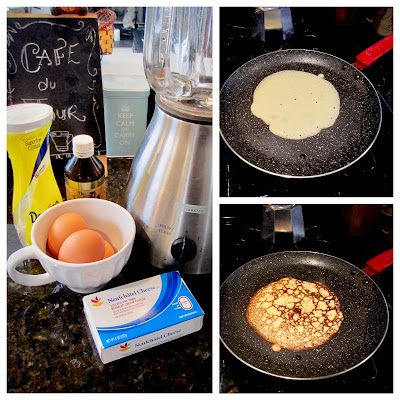
As someone who loves to enjoy these delicious and very adaptable treats, I have had limited success in making them at home. Sadly, more stacks of rubbery ill-shaped crepes have wound up in the garbage can than on the dinner table. So for my first celebration of Candlemas, I thought I'd attempt one of the easiest recipes I was able to find online at the wonderful blog savorytooth. With a few additions (vanilla and sugar), I was able to whip up some surprisingly tasty, flourless versions of these classic treats.

Wonderful as sweet desserts or savory meals, crepes can be reinvented with endless fillings or toppings from chicken and spinach to chocolate or applesauce.
I opted for sweet toppings for my customizable easy crepe bar including morello cherries in natural syrup, tangy lemon curd and fresh berries. Of course butter, honey and whipped creme are welcome additions as well.
Easy Flourless Crepes
3 eggs
1 oz package cream cheese softened (I used Neuchatel)
1 teaspoon vanilla extract (or other desired flavor)
2 tablespoons fine sugar

Simply pop ingredients in a blender until smooth. Pour a pancake sized amount onto a warm skillet or crepe pan and swirl until it forms an (almost) even circle. Cook over low-medium heat until golden brown, flipping once. Dot with butter and sprinkle with powdered sugar if desired.

Legend says if you hold a coin in one hand and successfully flip the crepe with the other, you will have good luck in the coming year. I admit I didn't attempt this.

Bon Appetite!
  
For more on Chandeleur click on why-do-the-french-eat-crepes-on-le-chandeleur


Tuesday, November 14, 2017

Autumn Antler Tablescape


While turkeys understandably take center stage at Thanksgiving, it can be fun to include nods to other wildlife in your seasonal Autumn displays as well.
 With my Halloween props and pumpkins still on display, I thought I'd use what was on hand to create a quick and easy Fall centerpiece.
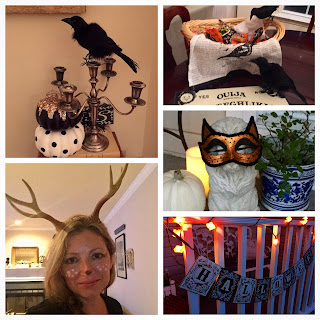
Pumpkins and Fall foliage are natural holdovers from the previous holiday and since this year my "costume" consisted of plastic antlers from Walmart (and some stick on deer face stickers from the drugstore) I thought I would play to the still popular antler trend this Thanksgiving.
Birds, a fox mask and deer made for a woodland twist on Halloween
deer friendly plastic antlers
I simply arranged the costume antlers with mini pumpkins, dried corn, faux leaves and Fall foliage in an old soup tureen base.
Nature inspired tableware, touches of gold and flameless candles complete the warm Fall palette 

Admittedly smitten with these forest friends, last year I opted for Thanksgiving deer decor as well with a vintage stag image and easy pumpkin redo.
simply click link for details
quick-thanksgiving-pumpkin-makeover


Give Thanks for Unknown Blessings already on their way
                                             Native American Saying


Wishing our U.S. followers 
a
Joyous 
Thanksgiving
our friends worldwide a 
Happy 
Autumn!

Thursday, October 26, 2017

Thrift Benefit for Animals, Last Chance Ranch and a Halloween Black Cat Shoe


If, like me, you love a good browse through a thrift shop, you know your purchases are all the more special when the proceeds go to a charitable cause close to your heart. A few years back, the talented blogger and animal lover Jeannette Cheney, from Country Design Style.com created an event to highlight those resale shops who specifically benefit our beloved furry, four footed, or feathered friends. 
   
The mission:
 Make a purchase from a thrift store that benefits animals or animal charities.
 Makeover the item (large or small) in a fun new way.
Then join up with other bloggers in sharing it all in a post on October 26th. 
This way bloggers from across the country can help promote these worthy causes and their big hearted shops. 
    
Lucky for me there is a delightful thrift shop in my area run by Last Chance Ranch, a wonderful organization that helps foster, care for and lovingly re-home countless abandoned or abused animals from horses to dogs to parrots and even lizards! 

 click link above to learn about this organization's history, mission and amazing work on behalf of animals
  
Their Shop
 The ranch's bright and cheerful shop features a wide variety of well displayed and fabulously priced items. 
It boasts an extensive array of pet supplies for dogs, cats, horses, fish and birds as well as gently used clothing, accessories and jewelry for their human friends. Also not to miss, are books, furnishings and home decor items. 
            
Since this thrifty blog challenge coincided with Halloween time, I thought it would be frightfully fun to do an easy project in the spirit of the season and happily wandered the charity's shop until inspiration hit, in of all places, the shoe section.
Charlotte Olympia Cat Shoes $495.00
I remembered a while ago these "cat" shoes had taken the internet by storm, appearing on celebs and "cat walks" and while undeniably charming, the $495.00 price tag was not. Of course crafty cat fancier fashionistas everywhere immediately took to making their own less pricey versions and I thought Halloween would be the perfect time to follow their lead and recreate this whimsical feline footwear. After all, what could be better for the well dressed witch this October season?
I found these black pumps with "kitten" heels on a display for $2.99 and was delighted to find they had been marked down to a mere $1.00
My other fab finds (I had to share) also included an almost new good sized pet carrier, pet dish, picnic basket, lace up riding boots (for my occasional lessons), classical CD, and a beautiful coffee table book on dogs - all for $17.00! 
   DIY Kitten Heels
With some basic crafting supplies, this was a fast and easy redo. Since I would only be wearing them for the "witching hour" as costume wear, I opted to quickly hot glue and paint on accents instead of more complicated sewing. Being fairly dainty, of course, these would not be good shoes for long walks, for children or for dancing the night away, but for a few hours handing out candy, I figured they would serve me in seasonally spooky style. 
I began by removing the decorative pearl accents and saving them for some future project down the line (one adorns the hat on my bewitching faux feline friend above). For the eyes, I used beads from a strand found at Joann's Fabrics in a sale bin, but you could opt to use buttons, paint, or for those talented in needlework, embroider eyes on as well.
Scraps or a sewing patch kit in a coordinating color is perfect for the small amount of fabric needed for the ears and squeezable fabric paint makes quick work of the simple ear accents, pink nose and silver whiskers. Simply glue and paint accents as desired to create your own fabulous feline, no great artistic skills needed.

 
Quick tips: a paper template keeps ears uniform in size. Depending on the brand, squeezable fabric paint can sometimes take hours to dry so be careful to avoid smudges while waiting for paint to set

I then popped in a pair of inexpensive leopard insoles for comfort and a chic touch.
 I chose black low heels for my project but any style shoe and combination of colors from tabby to tortoiseshell would be fun!
  
Wishing all of our friends, on two feet or four,
 a bewitching Fall Season!
Last Chance Ranch resident and four footed 
volunteer Mugsy and friends bring 
smiles to seniors in assisted care

For more on thrifty DIY's and Animal Charities, please pop over and visit these other creative bloggers participating in this fun benefit!
or
For Pennywise's previous benefit posts on the Ranch, Animal Lifeline and Animals in Distress, click HERE


Friday, August 25, 2017

Summer memories: forever sand castle clay recipe


Although summer doesn't officially end until September 22nd, it seems the season is already winding to a close. Store shelves are  brimming with backpacks, pens and pencils and even festive pumpkins are making an appearance, all marking the inevitable approach of fall and end to those carefree Summer days.
So in a last ditch nod to beach season, I thought I'd craft a fun and easy sand castle that won't be washed away by the rising tide. 
With some easy homemade clay, shells and ocean inspired accents you can channel childhood memories and build your own mini tabletop grown-up castle for a fun centerpiece or summery decorative accent.
A variety of recipes for "sand clay" can be found everywhere online and ready to use versions of it are available for sale at many craft and art supply stores.
 I opted to make my own, and after some rather messy trial and error, found this DIY clay recipe used for delightful sand ornaments from Local Fun for Kids. It was quick and simple using staples you most likely already have on hand in your kitchen and craft supplies.

You'll Need
2 parts whole wheat flour
 1 part salt
1 part water
dash of glitter and craft sand (optional)
shells
paper towel rolls
plate or saucer as base
moss or small faux plants (optional)
patience (these can take several days to dry)

This is sort of a "non recipe" recipe. Simply mix flour, water and salt to a clay like consistency, adjusting ingredients until the mixture is neither not too sticky or too dry. I added a handful of sand leftover from another project and generous sprinkling of gold and clear glitter, but these are optional. 
Then get creative and design your castle. I made a clay base and then created towers by covering a cardboard rolls with the sand mixture. 
I made a quick cardboard cone base for one for a pointed roof
Adorn with your choice of shells, faux pearls, sea glass or dried moss or faux greens. 


photo CPaul
The clay may droop slightly when drying but that just gives it that authentic beachy look. My husband joked that it reminded him of Gaudi's  famous cathedral in Barcelona
I built mine on a terra cotta saucer and perched it atop a smaller saucer to add a little height. Glass disks from a dollar store simulate water 
I then decided to give the saucer a quick light wash of pearly craft paint to work better with the sandy palette, an afterthought but an easy fix.


Simply display with shells a picnic basket or any beachy accents

vintage image from the Graphics Fairy


Thanks for Visiting!


Sunday, August 6, 2017

Afternoon Tea at Tilly Mints

In an age, when drive-thru dining and mocha lattes in paper cups are sadly the norm, sitting down to a leisurely afternoon tea is truly an all too rare luxury. A cherished tradition in merry old England, finding a good cup of tea on this side of the pond can be a challenge. Imagine my delight to discover that a mere few minutes drive from my home was the most charming of Tea Rooms.
Nestled on a quiet side street in Souderton, Pa, Tilly Mints, embraces all the charm of an English Tea room (complete with red phone booth) offering wonderful menu options, friendly attentive service and even an on site gift shop for all of your tea needs.
Pop over to their website tillymints.com for their menu, hours, and the delightful story of how Tilly's got it's name.
We opted for the full tea, and it did not disappoint. Our tea included a soup or quiche and salad to start, followed by three classic tiers of elegantly prepared treats (Yes those are tiny ladybug tea sandwiches!) and they gladly provided delicious vegetarian options for our table as well. 
Tea aficionados will revel in the extensive Tea menu with whimsical names for their blends like "across a crowded room" or "last mango in Paris".
Love that the shop is named for the owner's "saint-like" patient husband
The gift shop brimming with delights for tea lovers
Trish offers genuine warm hospitality and an enthusiasm that only comes from doing something you truly love
Of course, there was a delightful collection of teapots
Hope to get back again soon

Cheerio!