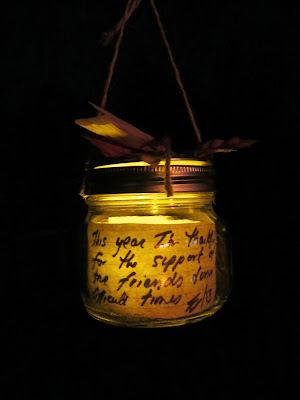
Wednesday, November 27, 2013

A Happy Thanksgiving


Wishing you and yours the Happiest of Thanksgivings


I am so grateful for my wonderful blog friends and followers and for their wonderful support and feedback during the first year of my blogging adventure!
and to our non-U.S. readers, Happy Fall!

Monday, November 18, 2013

Vive le Macaron - faux French sweets


There is much debate as to the date the famous Macaron (or macaroon) was invented, some tracing the treat's origin to as early as the 1500's some claiming a later 1700's date. Regardless of its origin, centuries later, this wildly popular colorful and elegant confection is having a hayday, starring in cookbooks and  confectioneries and being reinvented in hundreds of unique new flavors.
Since several attempts to create these heavenly sweets in my own kitchen resulted in a charred sugary disaster and three ruined cookie sheets, I figured my best bet was to go the faux (and calorie free) route with air dry clay and craft paint 
You'll need:
For macarons
Air dry clay
Gloss pastel colored paints
Glossy Puffy paint in coordinating colors
Photos of Macarons or the real thing for reference 
(This delightful book is from my local library)
old toothbrush, plastic knife or paintbrush with fine point end
 for packaging
Empty candy boxes (yes I have a sweet tooth)
scrapbook or decorative paper
printables
I started by shaping the clay onto Macaron shapes making the tops as smooth as possible. Using a small toothbrush I created texture around the center to simulate filling, pressing into clay firmly to define.
 Using the end of the dull side of a plastic knife, I made a small indent around the cookie in the textured filling area where the puffy paint "ganache filling" will be applied.
Allow to dry thoroughly.Patience required: Mine took over 24 hours.
Once the clay was completely dry I covered them with several even coats of gloss paint in flavorful colors, allowing to dry between coats.
Pipe Puffy paint around center to create filling and let dry.

Laduree window, Milan Italy CPaul2013
Macarons are often displayed in shop windows on cone shape trees so I thought I'd try it with my faux sweets version. I simply painted a cardboard craft cone and hot glued sweets in place.
You can also pop them into an apothecary jar or arrange on a decorative plate (to avoid unnecessary dental drama, make sure family or guests don't mistake them for the real thing)
Elegant Packaging is part of the joy of indulging in a fancy treat. A fun addition to your project is to create your own logo and label.
 You can cover empty box lids with scrapbook paper and add your own printable and ribbon if desired. I used vintage images from the the Graphics Fairy to create my own faux confectionery brand. When the paper didn't work for the larger box, I spray painted it with white primer instead before adding label. To my surprise it worked.


Faux Macarons make fun decor for a tea or dessert party. Serve the real thing with tea in coordinating pastel tea cups.

                                                                                   
  Laduree tea room and shop, Champs-Elysees Paris CPaul2013
Macaron gift shop, Versailles Paris CPaul2013


Fancy fast food:even French Mcdonald's serve macarons! Oo la la!
source: flickr


Saturday, November 9, 2013

How about them Apples


If Fall had a flavor I would be hard pressed to find a better one than crisp bright apple. Right up there with changing leaves and cozy sweaters, this favorite of fruits with its red, green and golden hues epitomizes Autumn.
As a child, a sweetly coated caramel or candy apple was a special seasonal treat, although rarely completely eaten in one sitting. Sadly they don't store particularly well once bitten into, resulting in a discolored gooey mess and pouting faces the next day. To the rescue: the popular mini apple caramel treats showing up everywhere on recipe websites.
For my version, I switched out caramel for a more dental friendly peanut butter coating in the same toasty color and added a sprinkling of crushed peanuts.

You'll Need
Large ripe apples - any variety
Melon baller
Meltable flavored disks 
Oversized toothpicks or lollipop sticks
Fall leaves or accents

Easy as....
1) Using melon baller, scoop ball shapes out of widest part of apple
 2) Insert toothpick in mini apple and swirl in melted peanut butter mixture covering any peeled portion but leaving a bit of skin peeking out for that authentic caramel apple look.
3) dip into crushed peanuts and Voila!
 Let cool on wax paper or place them in mini cupcake liners, if desired

 I created a quick label using vintage images from the Graphics Fairy and hung from mini clothespins

There are lots of fun and fancy Fall party picks available at party and gourmet stores, but I opted to simply spruce up some of the oversize toothpicks with pressed small leaves from my yard or a few knots of twine.


If you have leftover melted peanut butter coating and crushed peanuts, you can make a quick peanut butter bark. Stir crushed peanuts into melted coating and spread onto wax paper
 Let cool completely and break into smaller sections
serve with the mini apples or pop in a mason jar as a sweet gift or favor.


PennyWise Tips

Waste Not: After creating mini apples with melon baller, the extra unused apple scraps can be diced and added to muffin batter or other recipes

White or dark chocolate or other flavor melts can be used as an alternative, if allergies or taste rule out peanut butter. sprinkles, walnuts or mini chocolate chips can stand in for crushed peanuts.


Thursday, November 7, 2013

Thanksgiving Light

I'm so delighted to be included in the 
Thankful at Home Tour
From November 4th through the 8th, 25 bloggers will be sharing ways in which they add personal touches to celebrate the Thanksgiving holiday. Speaking of gratitude, a big thank you to Julie of Lilacs and Longhorns and Kelly of My Soulful Home for organizing this tour!
Don't Miss a thing! 
Click Here for a complete list of  participating blogs.

As part of the tour, I thought I'd share a quick and easy DIY that won't take too much time away from the turkey

While Thanksgiving is a holiday which focuses on traditions, sometimes adding a new element can create wonderful new memories to accompany the time honored turkey and pumpkin pie. 
With a few simple supplies you can add a little glow to your holiday decor while letting friends and relatives take a moment to express a personal timely message of thankfulness and maybe even start a new holiday tradition. 

You'll Need
Clear clean jars in any size or a variety of sizes
I had some mason jars and also reused tomato sauce and baby food jars (we had an aged cat who ate baby food) 
(*With baby food jars make sure votive fits properly inside some have smaller openings)
Assorted light colored scrapbook or white paper cut to the appropriate size(s)
Faux leaves, ribbon or twine
Decorative accents
Flameless votives
Basic art supplies
While kitchen duties, football, conversation and catching up often keep many revellers busy on Thanksgiving, a decorating station set up in a quiet area with precut paper strips and simple art supplies, allows guests to come and go and get creative at their own pace.

Laying a sheet of freezer paper down first prevents oopses on your furniture
I slipped a swatch of ivory burlap under the glass of a thrift store frame and penned a sharpie (easily erasable) message for inspiration.
In keeping with the season, I chose scrapbook paper with Autumn tones, family themes and nature inspired patterns
Oh so basic supplies include: sparkly gel pens, colored pencils, markers, scissors and glue sticks
tarnished pieces from an old tea set and a rustic basket keep supplies in easy reach.
Last years DIY burlap banner adds a festive touch
Simply have guests write their name,
date, and a quick word or phrase on the cut paper strips or let we artsy types create an image representing something we are grateful for, anything from serious or sentimental to silly. 
Once done, slip paper into the jar, pop in a flameless votive and replace lid. 
I spruced up the lids ahead of time with some simple faux leaves, rustic natural accents and hot glue and spritzed a few with hammered metallic spray paint
As daylight wanes and plates are cleared (weather permitting) lanterns can be displayed outside on a patio....
inside on a windowsill,
or mantel,
or hung from a porch or tree
If planning to hang lanterns you can place a loop of twine over jar opening and carefully screw on lid, securing in place or attach hanger using a strong glue or alternately wrap with wire.


Wishing Everyone a 

Wonderful Thanksgiving Holiday!

and for foreign PennyWise readers and friends

a Happy Fall!

Pennywise Tips
After the holiday, if desired, you can remove and keep gratitude messages and place in a scrapbook or keepsake box, reusing jars for next year.
 Have fun seeing how the messages change from year to year.
   
Or send guests home with their lanterns as a memorable favor 
   
Assign Kids or bored Tweens the job of helping to  assemble and hang or display jars

For more Thanksgiving projects and ideas pop over and visit
previous Pennywise posts.
Fall in love with Burlap

Fall into Sweet Treats


Thanks to all my readers
for making my first year of 
blogging such a delightful experience!