Wednesday, December 30, 2015

Mimosa Parfaits: Happy New Year!


Though never one to turn down the festive excitement of a big New Year's Eve party, I find nowadays I prefer the quieter, less frenzied celebration of New Year's Day. With no harried anticipation of the midnight hour, a more casual brunch or lunch takes a leisurely pace, perfect for resting up before returning to the hurry and flurry of everyday life. Of course still being in holiday mode, celebratory sweets and indulgences are a menu must, even if on the lighter side, after all of the seasonal excess.
I thought I'd try a twist on the classic brunch Mimosa by incorporating it's flavors of orange and champagne in a simple parfait, garnished with the obligatory strawberry of course. An online search yielded dozens of wonderful champagne and mimosa jellied desserts and molds recipes, I improvised with this easy version set in champagne flutes. Serve with fruit or your favorite brunch or luncheon fare
   
Mimosa Parfaits
You'll Need
for the orange layer
orange jello
(yes its trendy again!)
orange juice
Prepare jello according to package instructions, substituting orange juice for the cold water
pour layer into champagne flute leaving room for next layer and chill
I made six flutes but had some leftover 
for the champagne layer
I followed this recipe from the delightful 
teaspoonofspice.com 
and simply omitted the pomegranate seeds
  • 1 1/2 tbs unflavored gelatin
  •  (about 1 1/2 packages)
  • 1/2 cup cold water
  • 1 cup boiling water
  • 2 tablespoons sugar 
  • 3/4 cup sparkling wine or champagne

  • In a medium glass bowl, sprinkle gelatin over cold water. 
  • Let soften for about 3 minutes
  • Whisk in boiling water until gelatin is completely dissolved
  • Whisk in sugar until dissolved. 
  • Stir in champagne. 
  • Reserve about 1/3 of a cup and chill in separate bowl.
  • Pour the rest carefully over orange layer and pop in a sliced strawberry 
  • Chill until firm (mine took about 40 minutes)
  
If desired, moisten the rims of the glasses and dip in sugar sprinkles. To add a bubbly foam on top, blend reserved champagne gelatin with hand mixer or whisk and spoon on top especially around inside edge of flutes where bubbles naturally form. 
Set on a tray and enjoy.
Don't worry they're spill proof!

 
Bottles of bubbly get adorned with finery (strips of fur craft trim and costume jewelry) after an idea from Pier One

Last years DIY party hat adds a festive touch while a bird marks the passing hour. Long ice tea spoons are perfect for tall glasses
a silver ball atop a vintage clock gives a tiny nod to Times Square
 ********** 
It's fun to give a nod to some of the unique New Year's traditions from around the world in your decor and tablescape with fun props/conversation starters.
Some Fun Facts:
In the US we have been watching the famous ball drop in Times Square since 1907
In Columbia carrying your luggage around on December 31st ensures a year of travel and adventure
Brazilians offer white flowers to the sea goddess on Mew Years to help their wishes come true
In the Philippines eating round shaped fruit like oranges promises good fortune
(I had both leftover from my Nutcracker post)
And of course champagne, feasts and smooching are thought to bring happiness and plenty in the coming year in the US and many countries around the globe
Wishing everyone health and happiness, love and laughter in the New Year!


Wednesday, December 23, 2015

Season's Greetings

Many Thanks to our delightful Readers 
for your kind support and comments.
Here's to another year of creative crafting, kitchen capers and celebrating life's little moments.
Merry Christmas *Happy Holidays*
Joyeux Noel* God Jul* 
Feliz Navidad
*Happy New Year*
Wishing everyone all the Joys of the Season 
and 
Peace, Health and Happiness in the coming year!

Sunday, November 29, 2015

Visions of Sugar Plums: Nutcracker Sweets


 Without a doubt candies and confections play a sweet and starring role in the celebration of the Christmas season. Ironically one of the most oft mentioned holiday treats is the rather mysterious, but delightfully named sugar plum. 
     Generations of children have read of little ones drifting off to sleep dreaming of the confections in the classic Night before Christmas poem or perhaps seen the magical Sugar Plum Fairy dance across the stage in the famous Nutcracker ballet, but, many, myself included, hadn't a clue as to what exactly a sugar plum was.
images from the Graphics Fairy
      While some quick research revealed some conflicting ideas, the overall consensus was that these treats, which did not contain plums, were based on the sugar coated seeds and exotic spices called confits popular in Europe in the 1600's. Painstakingly made with layers of sugar syrup, they were a luxury for the wealthy and royals until later advances in production made them more readily and inexpensively available. 
      Fast forward to today and you can find a myriad of recipes for this centuries old treat, most including a combination of dried fruits such as dates and apricots, nuts, honey, sugar and assorted spices.
     I decided to whip up an easier, if not completely historically accurate version, and spruce them up with some colorful chocolate and a little sparkle.
I used
1 1/4 cup assorted mixed dried fruits
I bought  a package of mixed fruits including
dried apricots, golden raisins, peaches apples and cranberries
 but any of your  favorites will do
1 1/4 cup almonds
4 tbs honey
spices: 1/4 teaspoon cinnamon, dash nutmeg
chocolate melts, pink, white or lavender
assorted sprinkles

if desired "toast" almonds in a dry skillet for a minute or two to bring out flavor, stirring constantly
Give fruit and nuts a quick whirl in a food processor until finely minced. 
In bowl stir in honey and spices. 
Roll into balls and set on a tray lined with wax paper, chill until firm- you may need to moisten hands often to prevent sticking
Although healthier than many holiday treats, they sadly don't rank among the prettiest. 
To the rescue, a light coat of chocolate melts and some sprinkle magic. Simply melt chocolate according to instructions and spoon over sugar plums. Garnish with sprinkles or dust with powdered sugar and let cool completely

 I added some wintery Nutcracker themed decor and DIY party favors.
A mini nutcracker and royal mouse hold court under a glass dome.

Sugar Plum Fairy Wands 
I used:
A set of wands craft kit 
snowflake ornaments 
(both from dollar store)
assorted scrapbook paper
ribbon, trim, odds and ends
printable
I simply spray painted some fun foam wands
Images from the Graphics Fairy (Love her!)
cut and glued some images

 and had fun decorating


With the table set it's time to relax with a cup of tea. Sugar plums make an elegant snack after the watching the ballet
(even if it's just at home on TV)

Wishing all our readers 
a Magical Holiday Season

Monday, November 23, 2015

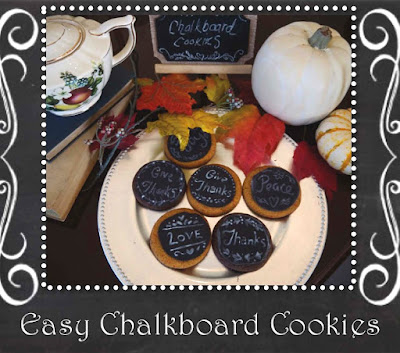
Chalkboard Cookies: Quick and Easy Holiday Treat

As someone with limited baking skills, I always get a slight twinge of anxiety when, as the holidays approach, a deluge of fabulous cookie recipes appear online, festive cookie exchange parties are planned and magazines feature picture perfect treats on their glossy covers. 
An avid consumer of sweets, I ironically never mastered the particular art of these bite size delights. Of course this doesn't stop me from poring over recipes during on a recent search, I found dozens of fabulous ideas for the most delightful chalkboard cookies!
As expected, most of these beautifully made cookies required a scratch recipe, fondant or carefully crafted royal icing. How, I pondered could I whip up a just-about-as-cute but simpler semi scratch version?
With some trial and error, store-bought cookies, some vanilla and black chocolate melts (leftover from Halloween), I concocted a fast and easy adaptation of these trendy treats. 
With chalkboard "everything" still going strong in the world of decor and crafts, these cookies go with a variety of themes and can be customized for any time of year including, Thanksgiving, or Christmas, or make a sweet gift for teachers.

You'll Need
Any plain flat round cookies 
(I used sugar and chocolate from my local supermarket)
black and white chocolate melts
plain white and wax paper
optional: 
confectioner's sugar
and
Wiltons white cookie icing
fine paint brush

Lay out plain white or parchment paper and using black chocolate melt trace out cookie shapes, spacing an inch or so apart.
Cover with wax paper so tracing is clearly visible
Melt black chocolate according to instructions. 
Gently spoon chocolate onto wax paper in center of traced circles, leaving border around inside edge
While still warm, gently press the cookies into chocolate
Let cool completely 
peel cookies carefully from paper and turn over 
the chocolate should have a smooth surface
break a few white chocolate rounds in pieces to use as "chalk"
and write on cookie. 
you can warm (but don't melt) white wafers slightly in microwave for a few seconds for brighter color writing
If desired rub a bit of powdered sugar around edge of chocolate for a chalky finish
for more detailed look or brighter white you can create designs using a new clean paint brush and ready made icing
simply melt icing according to directions, pour onto a plate and paint on or use a combination of the white wafers accented with icing
While this technique doesn't render the most perfect lettering, the effect is lots of fun and it's an easy, enjoyable kitchen activity for kid's to help you with
Serve with tea or cocoa and arrange with seasonal accents 

or use winter or Christmas themes to enjoy or give as holiday gifts

Wherever you are and whatever you celebrate,
Wishing our wonderful readers all the sweetness
of the 
Season


Sunday, November 1, 2015

Bienvenus Automne: Fall in France

Every once in a while, when a great travel bargain and those tricky airline points serendipitously align, an opportunity for adventure arises. This October I was delighted to travel to France for an (all too quick) boat trip on the lovely Seine river with stops in beautiful Normandy, an area I've always wanted to visit. 
on the river Normandy, CPaul2015
A highlight of the trip was a stop at the artist Claude Monet's garden in Giverny, and though it must be spectacular in Spring and Summer, the beautiful grounds, even at the end of the season, did not disappoint.
photos CPaul2015
  
changing trees, Giverny France CPaul2015
I soon learned that the region of Normandy is known worldwide for it's fine apples, delicious, but strong, calvados (an apple brandy) and exceptional cheeses. Boasting lush farmland, charming stone farmhouses and it's famous Norman cows, the area inspires rustic cozy recipes perfect for celebrating the crisp arrival of Fall.
I thought I'd recreate a little taste of Normandy once at home with this simple apple tart from the Barefoot Contessa (click HERE for recipe)
topped with a chantilly cream recipe I found on about food.com

Calvados can be pricey and tricky to find, 
but you can easily substitute rum, water or apple juice
Frozen puff pastry sheets makes this an easy recipe for those 
with limited baking skills (moi!)
lovely for dessert or a breakfast treat

Photo CPaul2015
I halved this recipe and found it made enough for a generous dollop on each serving

served warm or at room temperature, these tarts are perfect with a cup of tea and good book

Autumn, the year's last, loveliest smile
                                         William Cullen Bryant 


Wishing everyone all the joys of Fall!


Sunday, October 18, 2015

Raven Chandelier: Nevermore Decor


While tis the season to conjure up all manner of ghosts and goblins, regular readers may know that despite Halloween being my very favorite holiday, ironically I'm not a real fan of the grim, ghoulish or gory. Luckily it's fun and easy to add an air of eerie elegance to your decor without the frightful fear factor.
DIY chandeliers are all the rage (just pop over to Pinterest) and it's easy to find endless inspiration and fabulous, elaborate ideas online. I thought I'd share a relatively simple one I created just to add some flair to the holiday but have fun creating your own version. This is really an "anything goes" DIY that can suit a variety of favorite themes and color schemes
I used
child size hula hoop
black feather boa and tinsel
black faux flowers
 all Dollar store
party crown
beaded necklaces (5 for $1)
from party store
assorted ravens (from Halloweens past)
black spray paint
flameless votives 
black ones would have been great
clear tape
Although the hula hoop aptly featured a candy corn pattern, I gave it and the crown a quick spritz of black paint to go with the theme
I then secured the votives to the hoop with tape, spacing them evenly and making sure the on/off switch was accessible. I simply looped 4 strings of beads around hoop- no tape or glue necessary
I then draped the beads over the cross sections of the crown
 I wrapped the tinsel around the hula hoop and secured in spots with tape. 
I decided to add the boa under the crown as it was too short to go all the way around the hoop -  when I returned to the store to buy another, I found the display replaced with Christmas decorations!
I then popped on some feathered friends, and gothic flowers and once hung draped more beads over the hoop. When the sun goes down turn on the votives for a little magical glow.

Just a note:This is just a temporary and fairly fragile decoration which can easily be damaged, keep away from kids and pets, especially cats!

For more Raven ideas visit our past post
Nevermore

Wishing everyone a Delightful Halloween

I will be away from my blog off and on next week but I will respond to any comments upon my return 
Cheers!