As someone with limited baking skills, I always get a slight twinge of anxiety when, as the holidays approach, a deluge of fabulous cookie recipes appear online, festive cookie exchange parties are planned and magazines feature picture perfect treats on their glossy covers.
An avid consumer of sweets, I ironically never mastered the particular art of these bite size delights. Of course this doesn't stop me from poring over recipes during on a recent search, I found dozens of fabulous ideas for the most delightful chalkboard cookies!
An avid consumer of sweets, I ironically never mastered the particular art of these bite size delights. Of course this doesn't stop me from poring over recipes during on a recent search, I found dozens of fabulous ideas for the most delightful chalkboard cookies!
As expected, most of these beautifully made cookies required a scratch recipe, fondant or carefully crafted royal icing. How, I pondered could I whip up a just-about-as-cute but simpler semi scratch version?
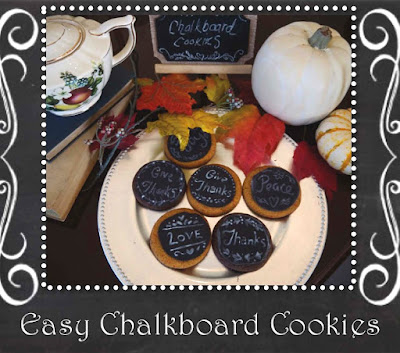
With some trial and error, store-bought cookies, some vanilla and black chocolate melts (leftover from Halloween), I concocted a fast and easy adaptation of these trendy treats.
With chalkboard "everything" still going strong in the world of decor and crafts, these cookies go with a variety of themes and can be customized for any time of year including, Thanksgiving, or Christmas, or make a sweet gift for teachers.
You'll Need
Any plain flat round cookies
(I used sugar and chocolate from my local supermarket)
black and white chocolate melts
plain white and wax paper
optional:
confectioner's sugar
and
Wiltons white cookie icing
fine paint brush
Lay out plain white or parchment paper and using black chocolate melt trace out cookie shapes, spacing an inch or so apart.
Cover with wax paper so tracing is clearly visible
Melt black chocolate according to instructions.
Gently spoon chocolate onto wax paper in center of traced circles, leaving border around inside edge
While still warm, gently press the cookies into chocolate
Let cool completely
peel cookies carefully from paper and turn over
the chocolate should have a smooth surface
break a few white chocolate rounds in pieces to use as "chalk"
and write on cookie.
you can warm (but don't melt) white wafers slightly in microwave for a few seconds for brighter color writing
If desired rub a bit of powdered sugar around edge of chocolate for a chalky finish
for more detailed look or brighter white you can create designs using a new clean paint brush and ready made icing
simply melt icing according to directions, pour onto a plate and paint on or use a combination of the white wafers accented with icing
While this technique doesn't render the most perfect lettering, the effect is lots of fun and it's an easy, enjoyable kitchen activity for kid's to help you with
or use winter or Christmas themes to enjoy or give as holiday gifts
Wherever you are and whatever you celebrate,
Wishing our wonderful readers all the sweetness
of the
Season
You'll Need
Any plain flat round cookies
(I used sugar and chocolate from my local supermarket)
black and white chocolate melts
plain white and wax paper
optional:
confectioner's sugar
and
Wiltons white cookie icing
fine paint brush
Lay out plain white or parchment paper and using black chocolate melt trace out cookie shapes, spacing an inch or so apart.
Cover with wax paper so tracing is clearly visible
Melt black chocolate according to instructions.
Gently spoon chocolate onto wax paper in center of traced circles, leaving border around inside edge
While still warm, gently press the cookies into chocolate
Let cool completely
peel cookies carefully from paper and turn over
the chocolate should have a smooth surface
break a few white chocolate rounds in pieces to use as "chalk"
and write on cookie.
you can warm (but don't melt) white wafers slightly in microwave for a few seconds for brighter color writing
If desired rub a bit of powdered sugar around edge of chocolate for a chalky finish
for more detailed look or brighter white you can create designs using a new clean paint brush and ready made icing
simply melt icing according to directions, pour onto a plate and paint on or use a combination of the white wafers accented with icing
While this technique doesn't render the most perfect lettering, the effect is lots of fun and it's an easy, enjoyable kitchen activity for kid's to help you with
Serve with tea or cocoa and arrange with seasonal accents
or use winter or Christmas themes to enjoy or give as holiday gifts
Wherever you are and whatever you celebrate,
Wishing our wonderful readers all the sweetness
of the
Season


What a clever and yummy idea!
ReplyDeleteThanks so much :)
DeleteSuch fun cookies! I love just about anything that's a chalkboard! Thanks for sharing at Submarine Sunday!!
ReplyDeleteThanks so much and thanks for hosting your fun parties! :)
DeleteMy dear Christina, what a darling and clever idea! This is such a fun way to brighten someone's day :)
ReplyDeleteThank you for sharing with Roses of Inspiration. I hope you're able to join us again this coming Tuesday. Hugs and blessings!
Thanks so much for your kind words!
DeleteAnd many thanks for hosting your lovely parties!
Just wanted to let you know that this post will be feautred at Roses of Inspiration tomorrow - thanks for sharing. Hugs!
ReplyDeleteThanks so much! I'm delighted to be featured!
DeleteWhat a great idea!! I can't wait to try making the chalkboard and icing. :) Thank you for sharing.
ReplyDeleteLove,
Ashley
creatingpreciousmoments.blogspot.com
Thanks so much Ashley!
DeleteSo glad you enjoyed the post. These are so easy to make :)
These are darling!
ReplyDeleteThanks so much! They are sort of silly but lots of fun to make :)
Delete