Raven Wreath
Autumn Lanterns
DIY Crystal ball
Tattooed Pumpkin
Papel Picado Banner
Cheesecloth Ghost Cats
_______________________________________________________
________________________________________________
Autumn Lanterns
Get your Glow on!
This craft is fun if not a little messy and costs practically nothing
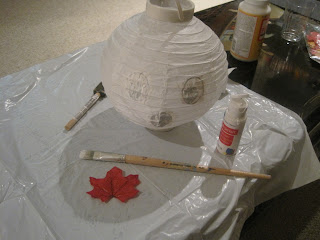
It starts with a couple lanterns (with built in lights) and bag of leaves (both from the Dollar Store) and either ModgePodge or white glue thinned with water.
If there is a design on the lantern it will show through. I painted over mine but then needed to cover with a scrap of paper as well
Then decoupage the leaves randomly - scatter a few or cover completely- It's ok if the edges don't lie perfectly flat against the lantern- it gives it a natural look
once you're happy with the design, let dry and display
__________________________________
_____________________________________________________
DIY Crystal Ball
If we were celebrating Halloween one hundred plus years ago, we might have forgone the guts and ghouls in favor of "divining" or fortune telling games and rituals.
Since it was considered a holiday for the young, much of the interest in the future pertained to romance and identifying potential spouses.
Cards, mirrors, firelight and crystal balls were all popular ways to see foresee the years ahead and while you can purchase a genuine crystal ball- here's a whimsical DIY version that won't break the bank.
I started with the Dollar Store (of course) where I found glass vases, small flameless votives (3 for $1) and a bag of cobwebs. I then scavenged around for terra cotta saucers, odds and ends and found a short flea market candlestick for a topper. I had on hand small bottles of Glow-in-the-dark and clear glitter paint from the craft store.
Using the Glow in the dark and Glitter paint, I lightly painted swirls on the inside of the glass vases and dabbed it generously on the cobwebs- it's like painting cotton candy but I did my best.
On the inside of one vase I painted a fortune- this is tricky but I'm sure spirits from beyond have messy
handwriting anyway
I spray painted the saucers a combination of black gold and white but any color combination will do- I went for an antique-y look. I used hot glue to attach the candleholder upside down on top of the "ball" temporarily. This way I could remove it later. When everything is dry place one or two flameless votives on the upside down saucer. Cover with cobwebs, carefully place vase on top and get ready to read the future!
 |
| mix tops and bottoms to create the look you like |
 |
| when the lights go down the effect is pretty fun! |
___________________________________
___________________________________________
Easy "Tattooed" Pumpkin
A quick easy and mess free pumpkin decorating idea!
Not in the mood to get out the paints or carving knife?
No worries....
Just put Dollar Store "Goth" or "Tribal" Temporary tattoos on a faux pumpkin and Voila!
Papel Picado: Day of the Dead Paper Banners
Banners make everything more festive and the famous Papel Picado cut paper flags so popular for the Day of the Dead in Mexico are true works of art, many cut by hand. You can order them online but many are quite pricey.
I tried to wing it by picking up some fun scrapbook paper at Joann's Crafts (my second home)
I splurged on the laser cut floral ($1.99) but the others range from 29- 59 cents.
I cut the large squares into 4 equal size "banners" and cut some simple skull patterns and glued them on several of the plain background. I punched holes in the solid paper and strung them on colorful ribbon.
The fun part is choosing the colors or patterns to match your color scheme.
Cheesecloth Ghost Cats
I'm not certain if anyone actually uses cheesecloth to make-cheese, but I know it is a Halloween crafting staple with ghosts being a must do on the DIY list.
To change things up a bit and in keeping with my addictions to all things feline, I decided to try to make Ghost cats this year.
Using odds and ends I created two cat forms.
and covered in plastic wrap
I cut cheesecloth in strips and apply with Modgepodge (or white glue) thinned with water
I applied like paper mache'
Let dry overnight
Removing the "insides" was a bit of a bugger, but if some of the plastic wrap remains no worries, it's clear
Next time I will make sure to make the bodies increase in size toward the bottom. I had to rip the foil parts in smaller pieces to remove.
The forms can be manipulated a bit to stand firmly
I decided they needed tails so I Modgepodged some tails curved over a plastic wrapped bowl and glued them on.
I painted light green eyes and shaded the top with a darker green blending where the two colors meet.
Boo bear is not terribly impressed at this stage
I don't usually use "google eyes" but since this is such a whimsical project I thought they added character.
For the whiskers I hot-glued nylon broom bristles.
I painted stripes with glow in the dark paint which doesn't photograph well in light or dark but looks fun in real life and added a nose and a mouth.
Shadow is not impressed either.
By day
by night (with plastic flameless votives)
Meeooowwwww
Coming Soon!
This is our new venture so please bear with us as we are Under Construction
our first bewitching blog will be filled with spooktacular halloween ideas!


Awesome ideas!
ReplyDelete~mary~
myhouseiscuterthanyours.blogspot.com
Thanks so Much! I just <3 Halloween!
DeleteOh my Holy Halloween! There's so much goodness here! #lovethat
ReplyDeleteCheers,
Therese @ Fresh Idea Studio
Thanks so much Therese!
DeleteI think this was my very first post lol
Cheers!