Saturday, December 29, 2012

Auld Lang Syne: Happy New Year


Champagne Bubble Tablescape * Noisemakers Makeover

I admit it: I happily slept through the last few New Year's Eves, blissfully unaware of the frenzied countdown to midnight in Times Square; but just because you're not wide eyed and bushy tailed at the stroke of twelve doesn't mean you can't enjoy some New Year's Spirit with a few easy and festive touches that won't start next year's budget in the red.

For these projects, much of what I used, I had on hand. Sometimes in the spirit Christmas creativity I overdo the craft and dollar store runs. So comes December 26th, it's not unusual to find myself with a few extra (meant to get to them) unused craft supplies: clear glass ornaments, pearlized garland, silver tinsel - still in packages. Fortunately many of these items in a crystalline or white palette translate perfectly into New Year's decor. Don't have leftovers? No worries, most of these, or similar items can be found at after-holiday sales for mere pennies on the dollar.

I'm so thrilled- this post was chosen as one of Rooted in Thyme's Friday Favorites!
Many Thanks!

Bubble, Bubble
Champagne Bubble Centerpiece


You'll Need
Aforementioned "leftovers": glass globes, beaded garland, anything sparkly
Fishing line or clear beading string
Clear Pearl effect  or sparkle paint (if desired)
Chandelier, overhead light, or ceiling hook

Since Champagne can quickly go flat, why not create a flurry of unbreakable bubbles over your dining table or buffet. Those glass globes which crafters reinvent a million ways over the holidays: fill with snow, paint like a snowman, etc - make perfect light catching "bubbles" when unadorned, just as they are. Of course, if desired you can simply swirl some clear pearl effect paint inside and let dry for added luminescence. Throw in some soft white or champagne colored balls and simply hang your bubbles amid any garlands or tinsel in whatever design catches your fancy. You can also set some globes on your centerpiece to continue the effervescent effect.

For this display I cut varying lengths of clear monofilament attaching a globe at both ends of each string. Then I draped the line over the different curves in the light fixture. This saves a lot of knot tying directly onto the light fixture- especially when you're precariously perched on a dining room chair. Also this allows an easy adjustment in the length of the line once they are hung- simply gently pull one globe longer- the other will shorten- but it beats tying and untying.


I added some smaller white "bubbles" and other sparkle for interest. Pop a bottle of bubbly display some noisemakers and you're ready to ring in the next 365 days.


 I painted a Dollar store tray with chalkboard paint and wrote MMXIII
(yes I had to look up the Roman numerals)
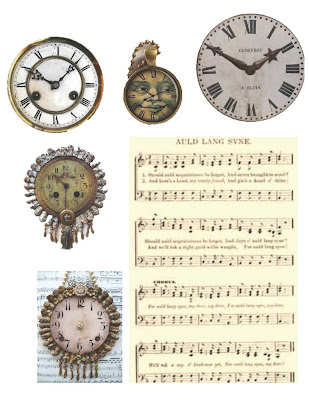
The "clock" is from the printables put into mini frame ornament
Disclaimer: That's Prosecco in the glass stand, a wonderful italian sparkler and great alternative to more pricey bubbly. The good stuff on the table was a gift!

Make some Noise


They say the tradition of noise makers dates to ancient times as a way to chase off evil spirits. Though these aren't guaranteed to transcend the spiritual realm, they look fun displayed on the table and will make a good clamor come midnight.


You'll Need:
Party noisemakers (run about a $1 a pack)
Clock and music Printables (on our Printables page), or scrapbook, wrapping paper or stickers
tinsel and streamers
odds and ends
glue or hot glue

Though these noisemakers scream "party", I thought I'd give them an easy makeover to highlight the vintagey  New Year's theme and toned down color scheme. I simply cut images and doilies and hot glued over the existing noisemaker, then cut out accents like the clocks and added with ribbon or tinsel accents, or whatever you have on hand.


I found this vintage free art online. The music is "Auld Lang Syne" which apparently loosely translated means "the good old days"

The fun part is making each one unique.

before and after

Wishing everyone A Happy, Healthy and Prosperous New Year!

great vintage images from: http://alteredartfun.blogspot.com


Thursday, December 27, 2012

Chance of Flurries

Edible Snow Globes


There is something truly magical about a snow globe. Who hasn't gazed wistfully into one, mesmerized by the miniature perfect frosty world contained inside? Originally designed as paperweights in the 1800's, snow globes, (or waterdomes or snow shakers) have literally taken the world by "storm"; from plastic souvenirs to high end crystal spheres complete with music and flashing lights.
I thought it might be fun to create an "edible" version and although these treats are not completely true to their highly popular inspiration, they are a whimsical dessert that looks fun on the table for kids or kids at heart.

These are similar to the little oceans (gummy sharks swimming in blue jello) you might see at a child's birthday party but use a clear gelatin, snowman peeps and coconut "snow"

You'll Need
marshmallow Peep Characters (frozen until hard)
gelatin or vegetarian alternative
shredded coconut
sprite or clear soda or juice
blue sugar or coloring
wine glasses or globe shaped glassware

I followed the recipe on the knox gelatin label for knox bloc, using clear soda (sprite) in place of the water and fruit juice and reducing the packets of gelatin to three, but depending on the brand you may need to experiment. I also added a dash of blue sugar sprinkles as I was out of blue food coloring, to give it a pale blue cooler hue and to counteract the natural yellowy cast) There are also several vegetarian alternatives to gelatin I am dying to try.

Pour a small amount of gelatin in bottom of cup adding a generous amount of coconut. Let chill (about an hour).

 Press snowman peeps firmly into firm gelatin base, cutting a slit in surface if necessary. Once frosty is standing steady, carefully pour in a bit more gelatin mixture (don't cover completely as snowmen will float to the top. I lost a few that way) Chill again and repeat process continuing to add layers of gelatin mixture and sprinkles of coconut a bit at a time. I kept the gelatin mixture at room temperature during this process
Once jelled, sprinkle with more coconut and enjoy!


These were a bit tricky to photograph and are clearer in person. They have a light lemon lime coconut taste. Serve on a silver tray to catch the light.
Would love to try a "grown-up" version with Champagne!

Wishing you the Happiest of New Years!

Sunday, December 23, 2012

Not a creature was stirring....


Pet Projects

Ginger Dog Treats in a Jar 
 Kitty Silhouettes

I recently read that Americans spend an average of $5 million dollars on their pets over the holiday season! Santa's list includes personalized Christmas stockings, a variety of toys and treats, not to mention spiffy new holiday outfits! 
Although Fluffy and Fido are worth every penny, here are some budget friendly ideas to celebrate our furry friends this season.


Ginger Dog Treats in a Jar

Recipe from Rachel Ray
http://www.rachaelraymag.com/recipe/gingerbread-biscuits/
While your baking human cookies, why not throw in a batch of yummy holiday dog treats as well? This is also a fun and easy gift for any of the dog lovers on your list.


There are also other great recipes to try at this site (peanut butter pictured above)
http://www.lovescool.com/archives/2005/03/29/boneappetit/

Please Note: the original recipe continued cinnamon but a reader mentioned this could adversely affect dogs so I removed it. Ask your vet to be sure!
You'll need:
 Mason jar or decorative container (must hold 3 cups)
3 cups Wheat flour
1/2 tsp ground ginger-
tag with baking instructions (we have one on our Printables page)
dog bone cookie cutter- or any holiday shapes (a cat cookie cutter would be a riot)
ribbon or twine

Directions
Simply mix dry ingredients in jar, attach a fun cookie cutter and recipe tag! 
*Make sure to check with your vet if your dog has any dietary restrictions


Kitty Silhouettes

Everyone has digital photos of their pets but why not turn those pics into a classic silhouette. Of course this centuries old portrait technique originally used candlelight (and lots of patience) but we'll do more modern easy DIY versions.
These can also be done for dogs (or birds, or guinea pigs or humans for that matter) but since cats are known for demanding adoration from their owners, honoring them with their likeness to be prominently displayed seemed a fitting tribute. 
You'll Need:
photos of subject in profile 
(this can be more difficult that it would seem-even with an infinite collection of cat pics like mine)
sturdy paper or card stock
assorted paints
mini canvases
old jar lids- spray painted solid color
scrapbook paper
ribbbon, trim, glitter, odds and ends 

Once I found photos to use I sized them to scale and printed them out on sturdy paper

 The model, overseeing the creative process
 with a dark pen, I outlined the subject, taking license with the fur around the neckline to create a pleasing portrait
The photos don't have to be great light or focus-wise, more important is the angle of their cute little heads. Once outlined, carefully cut out silhouette.

 I flipped them over to tell how they would look in a solid color. These were fine but I added on the second ears, just feeling they looked more feline.
                                   

 There are several techniques you can use to create your pet portrait.
Using the silhouette as a template I placed it firmly on a mini canvas and painted the background black using a dabbing motion- like sponge painting. Once removed, the negative silhouette is created in white.

 I touched up any imperfections in the outline carefully with a small paintbrush and added some wispiness to the fur in places and "Le Chat" in white. Then I topped with a ribbon hanger and Voila!
I then finished painting the template cutout black and was able to create another portrait


I chose traditional black for these but any color combo will do.I lined the lids with scrapbook paper and glued the cut out portraits in the center. I also tried to match the color and style to the pet's personality: one loves sitting on books so I used the script the other fancies herself a princess so the pink damask.
 I then covered with a coat of Diamond glaze, let dry thoroughly and added trim, accents and ribbon hangers.


Wishing All Creatures great and small a Happy 2013!

Saturday, December 15, 2012

A wing and a prayer


Angels' Wings
we get in such a rush
to fill our lives with things,
we seldom take the time
to feel the brush
of Angel's wings
                           unknown

Angel Globes * Feathered Wreath
Who couldn't use a little divine intervention in their decor? The holidays are the perfect time to add some angelic touches to your home. Of course these heavenly crafts have to be created on an earthly budget.


Angel Globes

Yes, everyone's seen these clear ornaments used a million and a half ways, but here's a simple craft that's not necessarily just for the holidays. These globes can be hung in a window, dangled on a Christmas tree branch, or simply given as a delightful gift to any of the "angels" in your life.


These are a bit tricky to photograph but they consist of an "angel" feather and mini "halo"
resting in a bed of sparkly "snow"
I hung from white ribbon but something glittery or rustic raffia would work as well
or perched one a candlestick (mine's a dollar store find with a light coat of spray paint)
or suspend from an "instant" tree (I made one of found branches spritzed with a light coat of white spray paint and glitter. I stood the branches in flower foam in a white ceramic container -covering the foam with craft moss- be sure to choose fairly sturdy branches and secure them well- my first attempt took a tumble when I added ornaments- much to the delight of my cats)

You'll Need:

Clear ornaments
Epsom salts and "faux" snow or glitter-
the epsom salt adds enough weight to keep it balanced
Craft feathers in white
Ribbon
Glittery pipe cleaners
Angel quote tags


Easy How-to

Funnel epsom salt with a bit of glitter or "snow" into globe

Pop in feather or two

Create small halo from pipe cleaner and squeeze through globe opening
If halos get a little misshapen use 2 skewers or cocktail stirrers to reshape halo inside globe. I positioned two skewers in opening in halo and pressed outward to reshape. (like building a ship in a bottle but not as hard as it would seem)

Use skewer or stirrer to rearrange or adjust items

Hang from ribbon and attach a quote if desired
 (here are a few of my favorites also available on the "Printables" page)


Feathered 

Wreath


I saw a feathered wreath at my local craft store and loved the gossamer glamour but wasn't thrilled with the price tag. I reinterpreted my own version for a fraction of the price. Since they say doves are the angels of the bird world I added one for good measure.
craft store feather wreath $34.99

You'll Need
A basic wreath: 
(mine was straw and $1 after thanksgiving but any type that could be painted white will work)
White spray paint
A feather boa (from craft store- you may need 2 if wreath is large)
Some additional feathers (I had them leftover from the angel globes)
Self Stick-on sparkles or faux jewels
Assorted doves or ornaments of your choice
silver doilies - optional
Ribbon or hanger
glue gun
 Easy How-to
(this is similar to our black Raven Halloween wreath from our Halloween Fun post)

Spray wreath with a quick coat of white paint (if it's not already)

Glue one end of feather boa to back of wreath and wrap evenly all around, adjusting as necessary

Glue or secure other end of boa 

 Looks a little sickly so far

Hot glue extra feathers for fullness. I trimmed the tough "quill" ends off of some feathers for a lighter fluffier effect. I also felt my wreath needed some more subtle sparkle, so I cut up a small plastic snowflake (6 for  $1) and glued it's "branches"among the feathers.

Then get creative: add sparkles, birds, ornaments, to taste- I cut a small "crown" from silver doily and glued on to dove's head for a royal touch. I tried a few arrangements with the accent ornaments before committing to glue and opted for a fairly simple design (if feather boas, sparkles and birds in crowns can be described as simple)

Hang with ribbon or hanger if desired

*Not wild about white? This idea could be reinterpreted in any fun or unconventional holiday color: Vintage Pink, Dove Grey, Baby Blue?

I tried a few different vignettes and thought the wreath worked well with the angel globes and some (not necessarily Christmas) bird themed odds and ends I had on hand.


Wishing everyone Joy 

and 

Peace this Holiday Season